Removing radiator sludge is an essential maintenance task that can significantly improve the efficiency and lifespan of your heating system. Over time, radiators accumulate a thick, muddy residue composed of rust, dirt, and other debris that can obstruct water flow and reduce heat output. Ignoring this buildup can lead to cold spots in your home, increased energy bills, and potentially costly repairs.
In this article, we’ll guide you through the steps a professional heating engineer would likely take to effectively remove radiator sludge, ensuring your heating system runs smoothly and efficiently, providing consistent warmth throughout the colder months.

Assess Your Heating System
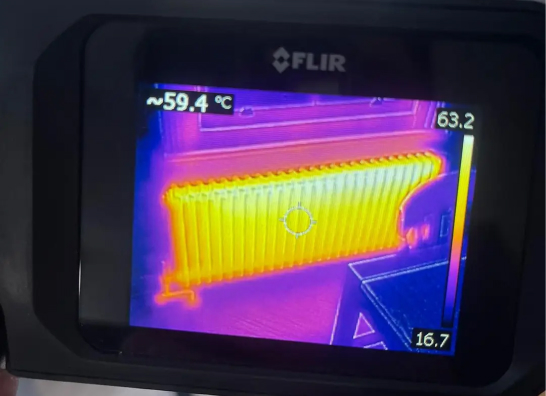
The heating engineer would inspect and evaluate your heating system to identify signs of sludge, such as cold spots on radiators, noisy boilers, and reduced heating efficiency. They will typically use a thermal imaging camera or a flow and return temperature differential check to assess the extent of sludge buildup.
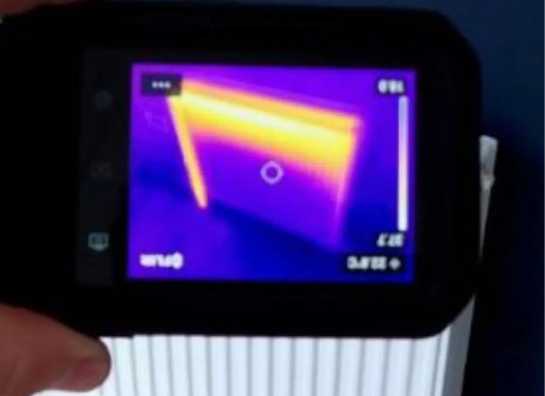
unbalanced radiator
VS
balanced radiator
Thermal imaging showing a healthy, balanced radiator Vs an unbalanced radiator
Depending on the severity and location of the build-up, the heating engineer will determine whether just one or two radiators may need flushing, or the whole heating system.
How To Flush A Radiator
Preparation
The first step is to turn off your central heating system and allow it to cool before you continue (60 or 90 minutes should do the trick). This will avoid burns and other injuries.
It is also important to protect the floor underneath your radiator(s) and the areas surrounding them. The sludge at the bottom of your radiator will cause the water to be very dirty – it’s not pleasant! Place protective coverings around the work area (old towels, sheets, blankets) to prevent damage from spills. Sometimes, the water squirts out so don’t be shy in covering a large area around the rads – a good heating engineer will come prepared.
Drain The Radiator
Next, the engineer will locate and open the radiator’s drain valve to release the water and sludge from the radiators and pipework. They will also open the bleed valve on the radiator to facilitate faster draining and to allow air to enter the system.
The engineer will place a bucket under the thermostatic radiator valve to catch any water that leaks out when the valves are undone. Using a couple of adjustable spanners (or similar), they will grip the valve with one spanner and loose the nut that connects the radiator to the valve with the other.
The bleed key will then be used to open the radiator’s bleed valve to help the water flow out easier. They’ll loosen the lockshield valve in the same way and will likely tip the radiator to ensure all the water is out. When confident all the water is in the bucket, the bleed valve will be closed off using the radiator key.
Remove The Radiator From The Wall And Flush Out
Next up, all the nuts connecting both valves to the radiator will be undone and the radiator will be gently lifted off the wall brackets. Have the bucket handy to tip in any lingering water in the radiator.
Carefully, the engineer will take the radiator outdoors and place your garden hosepipe in the inlet pipe and switch it on. The water should flow out the other side of the radiator. The engineer will ensure he works in an area of your garden where mess isn’t an issue. After five/ten minutes, the hose will be switched to the outlet pipe until the water coming out is nice and clear.
Connect Everything Back Together Again
When the water is running clean, and the engineer is satisfied that as much sludge as possible has been removed, the radiator will be reconnected in the opposite way described above – the lockshield valve will be opened back up, and the bleed valve will be opened up to allow any air to escape before being closed back up again.
Switch The Central Heating Back On Again
The heat will be switched back on and the engineer will check that the radiator is getting warm more evenly.
Powerflushing Your Heating System
If more than one or two radiators need flushing, or severe sludge build up is determined in all the radiators and pipes in a central heating system, the engineer may suggest powerflushing the whole system. Similarly, a powerflush is normally conducted when a new boiler is installed in a property.
A powerflush can be carried out manually with a hose. However, if possible, an engineer will use a powerflush machine, which pumps water and cleaning chemicals through the system at high velocity. These contaminants are dislodged and removed. This thorough cleaning process restores optimal water flow, improves heat distribution, enhances overall system performance, and helps prevent costly repairs and breakdowns, ensuring consistent warmth and energy efficiency throughout the home.
Powerflushing A Central Heating System
We always recommend enlisting the help of a professional plumber or heating engineer to carry out a powerflush, particularly if you have an older system, with delicate pipework etc. However, to provide an understanding of how a powerflush is carried out by a professional, here is our guide:
- Carry out an assessment of the central heating to assess its condition. A heating engineer will check for signs of reduced heating efficiency, uneven heating, or unusual noises, which are typical symptoms of sludge build up. The engineer will also determine whether a manual or powerflush is best – some older houses have older pipework and structures that may be damaged by powerflushing.
- The engineer will isolate the central heating system from the rest of the house, ensuring that only the heating circuit being cleaned is affected.
- They will then connect the power flush machine to the system and introduce a chemical cleaner to the system. This machine is equipped with a pump to thrust water and cleaning chemicals through the system at high velocity to dislodge and remove sludge.
- The engineer will run the power flush machine, alternating the flow direction to ensure thorough cleaning. This process may be repeated several times until the water runs clear.
- After flushing, the system will be rinsed with clean water to remove any remaining cleaning chemicals. A neutralising agent will be added if necessary.
- A corrosion inhibitor will be introduced to the system to prevent future sludge buildup and protect the system components.
- The drain valve will them be closed and the system refilled with fresh water.
- Each radiator in the property will be bled to remove any trapped air, ensuring efficient operation and preventing airlocks.
- The engineer will then inspect the entire system thoroughly for any leaks or other issues.
- When satisfied, the heating system will be turned on and its performance monitored, checking for even heating across all radiators and proper boiler function.
- A final inspection will be conducted to ensure everything is working correctly.
- A professional heating engineer will always offer the homeowner tips on regular maintenance, such as annual boiler servicing, system checks and the use of corrosion inhibitors, to keep the heating system running efficiently.
Read our blog on ‘how long a powerflush takes’ for more information. By following these steps, a professional heating engineer can effectively remove radiator sludge, restoring the heating system to optimal performance and ensuring consistent warmth throughout the colder months.
If you are based in our service area, and need a professional, Gas Safe engineer to flush out your heating system, we’d love to help. Whether it is a single radiator or the whole system, it’s not a problem. Contact us at your convenience and we’ll do the rest!
Happy Dog Plumbing Limited, Trident Business Centre, 89 Bickersteth Road, London, SW17 9SH
Company number: 9334196. VAT No: 203 0386 57